1)Recording
natural flatpicked acoustic guitar
There's been
some interest in recording flatpicked acoustic guitar naturally without
EQ and expensive outboard equipment. This has been a long sought
goal of mine ever since I first heard the landmark recording "Tone Poems"
with Tony Rice and David Grisman.
A search of the internet will quickly reveal that few
if any understand the "sound" we as flatpickers desire from our gutiars.
Even self proclaimed experts found on various forums have no idea how to
record an acoustic guitar. Much of this can be attributed to the
"standard" sound poeple come to expect from an acoustic guitar, commonly
referred to as the "Nashville" method. Not the sound I want or desire.
This is your typical acoustic sound you hear in a country music recording
as well as on most pop rock music. Tinny, thin, bright, lack of depth,
death to the tone, heavily compressed, disgusting sound. Someone
needs to put true acoustic guitar tone on the endangered species list.
I've spent a good number of years experimenting with a
variety of mics, preamps, recording media, and mic positions. It
is not difficult to learn but it is difficult to master. I'll try
to briefly describe a process we all go through as home studio recordists
as we search for that natural tone.
Mics:
This is by far the deepest darkest hole
that most recordists fall into. The current market of "sounds just
like a Neumann" mics are saturated with cheap second rate products.
One thing I've learned in nearly ten years of experimentation is that cheap
mic = cheap sound. The current voice on the internet will tell you
differently. Years ago, any respectable studio wouldn't have anything
but the best, but nowadays a studio can be put together with a few bucks,
thus we literally have thousands of inexperienced engineers who litter
their studio with cheap mics from overseas, thus claiming that they have
that "sound". I don't claim to know what's best, I ask people who
really know.
Billy Wolf: Tony
Rice's respected sound engineer for many years. There is a genuine
smoothness that immediately stands out to me in all of Billy's recordings
of Tony. That "sound" can be associated with the fact that Tony wanted
his guitar to sound like a Spanish guitar. Smooth, silky, yet not
lacking in punch.
- Billy has been kind enough to respond to many of my
questions over the years about recording, mixing, etc.. In Tony's
earlier recordings, Billy has used Neumann KM86's and U89's. He recommends
as first choice a matched pair of KM86's. A U89 and KM86 is also
an excellent pair.
In addition Billy has used U47's on occasion.
We have also seen Tony use a Sony C48, Neumann KM184,
AKG 451. I've used all of these.
Preamps:
This is without a doubt as important as
the mic itself. What's most important is to obtain a neutral,
often described as transparent, sound. We want the mics to do the
job of coloring the sound, not the mic pre. Reproducing a clean sound
is easier than coloring the sound, thus we have a good selection of pre's
on the market. What to avoid is anything that people describe as
having "iron" or color in the sound.
Recording
media:
This is a common sense decision. Digital
or Analog. The argument is old so I won't go there. I have
a Fostex E-2 two-track analog recorder as well as a 24-bit A/D digital
multitracker. With digital, the most important aspect is the Analog-to-Digital
converters. Make sure you get a good one. If you want the best,
buy an outboard A/D converter and use the digital input on your multitracker.
Mic
positions:
This is the meat and potatoes of this little
informative article. What we want is to record in stereo. So
we will use a two mic setup. Piano and acoustic guitar are some of
the most difficult instruments to record because they are so dynamic in
frequency. Our goal is to capture the breadth of the guitar
maintaining a balanced tone. Depending upon your particular guitar
you will have to work with the mic positioning a bit to find that sweet
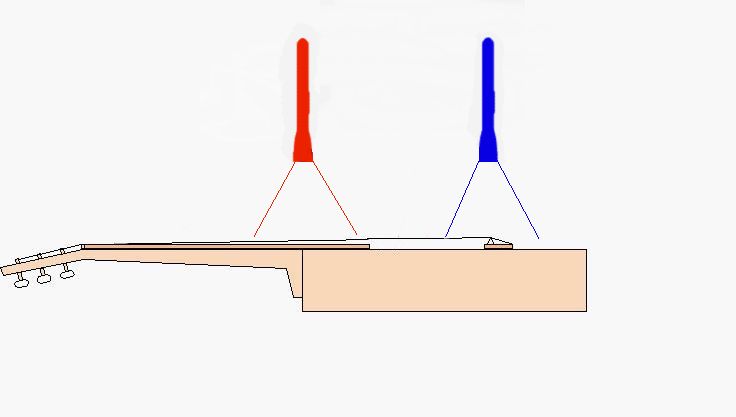
spot. Let's look at a common mistake.
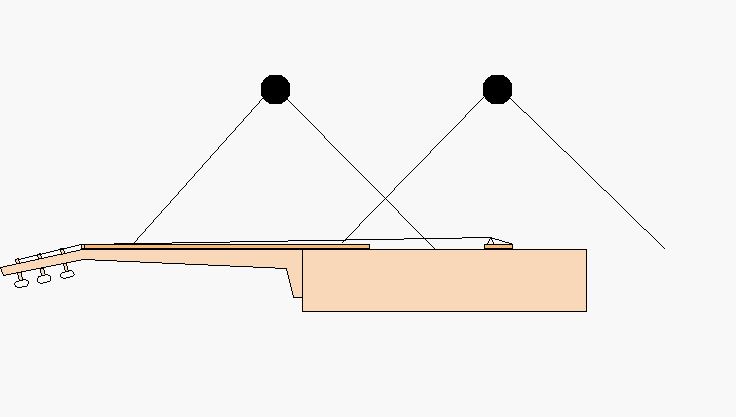
In this case both mics are too close together.
Remember that a cardioid pickup pattern will capture sound from a large
area. What is occuring here is that both patterns intersect in the
area of the soundhole, being the bassiest part of the guitar. Your
resulting sound will be bass heavy, unbalanced, requiring lots of EQ.
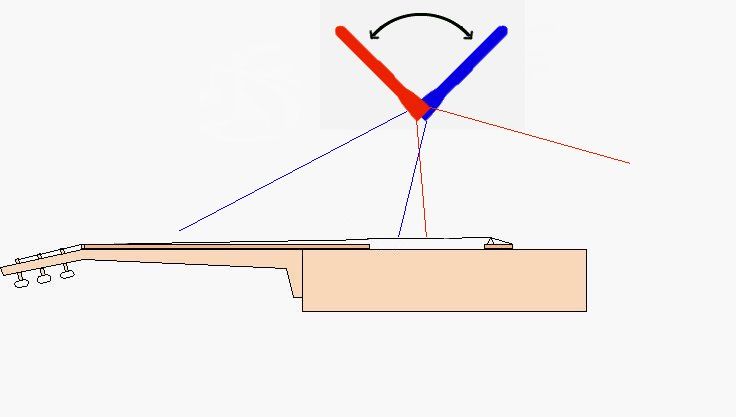
Now let's look at a way to remedy this.
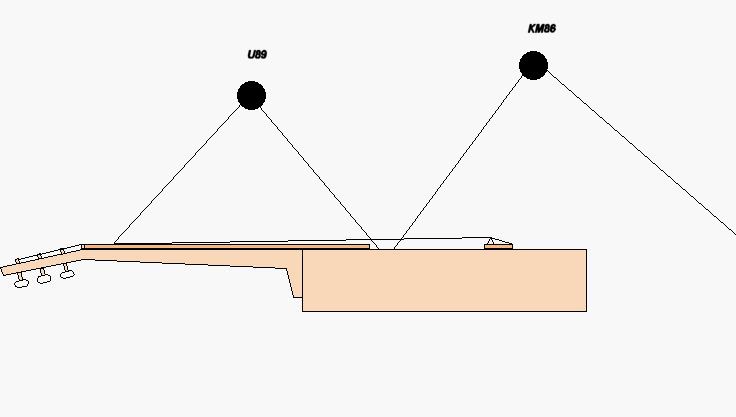
This is a current setup I use when I want no EQ.
What we have essentially done is move the U89 a tad closer and moved the
Km86 a little farther back. In addition the Km86 is turned a little
to avoid crisscrossing the signals. What we have is a workable solution
in a natural sound context.
Distance from guitar:
A quick word on mic distance from the guitar.
There are three reasons why I choose a particular distance from the guitar.
1) Pick noise. The closer you are the more pick
noise you will hear. I particularly like the sound of the pick hitting
the strings. I think it feels more intimate to hear this sound.
2) Bassiness. Obviously the closer you are the more
bass you will hear. Also referred to as the proximity effect.
This will need to be balanced with your desire to hear low frequency and
your desire to hear pick/fret noise.
3) Stereo delay. When one mic is closer to the guitar
than the other, it will capture the sound sooner than the other.
What you have created is a wider stereo field. This can be done with
outboard equipment, but that is not our desire.
Phasing:
Phasing occurs when signals from two mics cancel
each other out. Normally the result will be an abhorent loss in low
frequency. It is easy to remedy by using the polarity switch pattern
on your mic pre, but the results may be marginal. Another method
is to pan each mic full left and right which will stop any phasing errors.
2) Close
miking and the use of compression
a) Close miking:
Another method of recordingsolo
guitar, or when only limited instruments are in the mix, is the use of
close miking. Let me illustrate a setup I use for close miking:
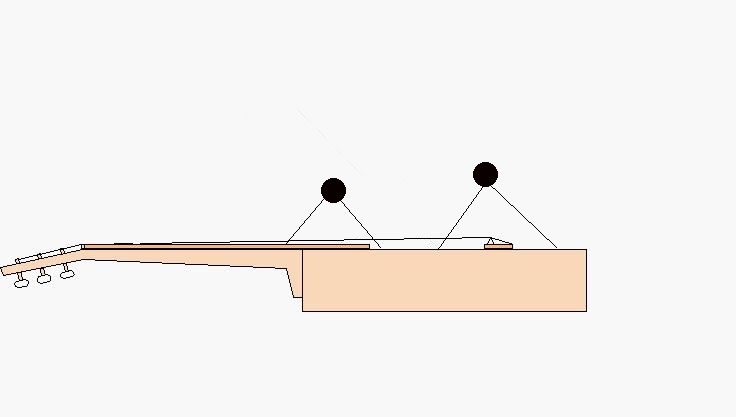
In this circumstance I use a Neumann KM184 on the left
and a KM86 on the right. Distance to each microphone varies from
8 to 10 inches! One will immediately ask, what about too much low
frequency? An excellent question. Notice that careful placement
of each microphone is critical. I try to aim for the wood between
the soundhole and where the neck meets the body on the left side, and for
the right side, I like to hit the area of wood just below the bridge.
If needed, turning one mic or the other on it's axis will help direct the
pickup area away from the soundhole, if you desire.
Important factors:
1) The guitar: The natural tone of your instrument
will dictate location of each mic.
2) Playing style: Hopefully we all flatpick, otherwise
you probably wouldn't be reading this. But also in this variable
is volume control, pick control (sloppiness).
3) Strings: Yes I said strings. I am
a string nut. Almost equally as important as your guitar, the strings
have a great deal of influence on the tone of your guitar, especially
when recording through sensitive microphones. Remember, a good mic
will pick up every fine transient detail.
4) Room: The room you record in is equally as important.
I cannot stress this enough. If you hear any echo at all in your
sound room, fix it. Absolute dead walls is what we want.
In the future I will post some audio of close miked samples
using this method.
b) Compression:
I've been asked, don't I ever use compression on
acoustic guitar? The short answer is yes, and this is where this
article begins to take on a new face, from natural recording to using some
light compression.
For the great majority of the time, I will not use any
compression at all, and that means solo guitar. However, when you
begin to add instruments, specifically a second guitar, the use of compression
is virtually required. Compression simply "compresses" any sound
that exceeds a certain volume or dB level that you choose. By doing
this, the compressor also makes soft parts louder. That also means
pick noise, breathing, your right pinky brushing against the soundboard,
fret noise, your furnace running, that dish-washer in the kitchen, anything
that normally is soft enough to not be heard, and this includes notes that
should have been louder, etc.. So as you can see it is a two-edged
sword. The result is that now you have to add in a noise gate, yet
another piece of gear that will cancel out unwanted sounds under a certain
dB level. EQ boards to cancel out unwanted frequencies, and the equipment
list goes on and on and on...... Now you see why natural recordings
are so simple, yet so elegant.
So how the heck can one use compression without having
to rely on all this other crap to make a good sound? We first have
to define when to use compression.
1:When
should I use compression?
There are a few circumstances when I will use it:
1) When room acoustics are perfect
plus:
2) More than one guitar and/or another instrument that
tends to clash with the guitar
3) When vocals are part of the music
4) When natural volume of the player is inconsistent
5) When I feel like it
These are really the only times when I will introduce
any compression at all. But remember this is not about general
use of compression, this deals specifically with my requirements, that
being a natural recorded acoustic guitar sound. Compression is used
all the time in many venues and on many instruments. It sounds particulary
good on mandolin and banjo.
2: The
need for balance
When speaking of balance I am referring to the
balance of tone and volume. Think of each string on the guitar as
an individual instrument in a six piece band. If one instrument is
louder than the others, we can simply decrease the volume on that channel.
If one instrument is too soft, then we raise the volume on that channel,
until we have a balanced chorus of instruments.
Obviously, this cannot be done on an acoustic guitar.
If your guitar is bass heavy, then it will project a heavy dose of low
frequency and the mic will pick this up. The result is an unbalanced
tone saturated in bassiness. There are many ways to counter this,
use of mics with low frequency cutoffs, placement of mics, use of EQ, etc...
So understanding how to adjust balance should be easy
for you at this point. I like to rely on proper
mic placement as previously mentioned in this article. So
lets move on to the reason why I mentioned the need for balance.
The problem with unbalanced signals and compression:
A compressor reacts to one thing,
volume, or the overabundance of it so to speak. So imagine what happens
if you fail to properly set up a balanced signal and the result is a bass
heavy sound. The compressor will come into action when those low
frequencies exceed the threshold resulting in a muddy, overly compressed,
unnatural sound. The delicate tones will be lost. The opposite
will happen if the signal is overy trebly in tone, however with dreadnaughts
I find that low frequencies are the problem.
Remember, a good sound starts with good playing.
You cannot rely on electronics to make you sound good. They might
make you sound a bit better, but the real power is in your ability to create
a clean balanced sound before the
signal passes through any effects.
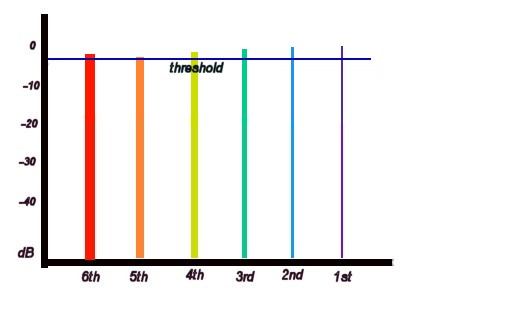
The oh so important Threshold
and how an unbalanced sound source can ruin it:
Think of each string on your guitar as a bar on
a graph, then think of the threshold setting as horizontal line that you
can raise or lower on that graph. Wait, let's actually look at one
just like that.
Unbalanced source:
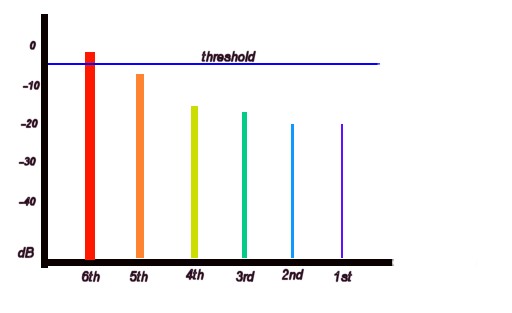
The vertical side is your signal volume.
You want to try to bring each frequency up to 0dB, compress it, then use
the +gain knob on the comrpessor to bring it back to 0dB. With this
graph, the 6th string is putting out some serious noise, while the higher
strings aren't loud enough.
In reality, each string would actually represent frequency.
The 6th string would represent the low frequency and the 1st string the
higher frequency. But the concept remains the same. What's
happening here? If you have your mics improperly placed and you are
getting too much bassiness, then the low end is activating the compressor
by exceeding the threshold setting. You would certainly not want
your bass heavy dreadnaught directing the compressor when to work.
Equal compression is what we want.
Balanced Source:
This is our goal. To start with a balanced
sound. That way all the frequencies are activating the compressor
equally. Your resulting sound will be cleaner, smoother, punchier,
heck, it'll even wash your windows and do your dishes. The compressor
will love you. And your audience will love you too.
Is it difficult to achieve a balanced sound? You
bet. Do lots of folks forego the balanced source and just reach for
all the gadgets and EQ boards to achieve a balanced source? You bet.
Does it then kill the tone and sound like crap? You bet. Are
you now starting to understand what I said at the beginning of this article
as to how true recorded acoustic guitar tone is a rarity, relying on effects
and electronics to achieve a workable sound? I hope you are.
Acoustic tone is delicate piece of china.
It is beautiful to behold, but easily broken. The sound that comes
from that exquisite Brazilian Rosewood Martin guitar is so complex, so
beautiful, yet so elegantly simple. Treat it with kid gloves.
3) More
on microphones
Here is my take on various mics I've owned
and how they affect acoustic guitars.
a) Neumann U89
Not a true large condensor mic. The capsule is actually
3/4" in diameter. It is a small mic sound in a large box. This
mic has been described as "darker" version of it's brother the U87 (not
really true though). Since both mics look similar, people tend to
make this comparison. Other than their name, the mics are in totally
different classes.
It contains a low frequency cutoff switch at 80hz and
160hz.
It can make "tinny" sounding guitars a bit punchier.
With the low frequency cutoff switch it is an excellent first choice mic
for close miking. This mic sounds particulary good on my guitar since
mine does have a bit of brightness I like to exclude from the final cut.
It is also good at cutting out pick noise, fret noise, string noise.
A perfect choice mic for guitars if you can afford it. Probably my
2nd favorite mic to use. If your guitar is particulary bassy, the
cutoff switch at 160hz will need to be used.
b) Neumann KM86
This is a legendary mic, bar none. If you can still
find one, and can afford one, then get one, or two, or three. They
are investments and you will always get your money back or even make some
money. Why legendary? First MoTown. This mic was used
almost exclusively in the early days of MoTown, even for vocalists.
Second, not to mention famed engineer Billy Wolf has a pair of *matched*
86's, (rare as a $3 dollar bill), and the majority of Tony Rice's early
recordings were done with this pair. The mic has two capsules inside
opposite of each other. The capsules are essentially the capsule
from the KM80 series of mics, km84, km85, etc.. However, the electronics
are different which give this mic a large condensor sound.
Tonewise, the mic is smooth. It has a subtle frequency
increase on the high end and this is the only thing that makes the diagram
look different from a KM84. Unfortunately the mics is extremely sensitive
and requires a good acoustical environment to be used properly. It
has one magnificent characteristic of capturing low frequencies even 3
feet from the sound source. The mic can be overwhelming with bass
so an EQ unit is almost always needed with this mic.
c) Sony C48
This is a large condensor mic, with a built in unit to
squelch vibrations. It is particulary good for use under poor acoustical
environments. It has two low frequency cutoff switches called "music"
and "voice". Somewhat rare, it is a decent mic that tends to blend
well with other mics.
Tonally it can be described as being somewhere between
a U87 and a U89. It is not dark, nor bright. Actually, it sounds
very natural almost the sound you hear as your playing. With the
low frequency switches turned on it can be used directly in front of the
guitar. Bass and close proximaty effects do not apply. It has
a frequency range of 30hz to 16kHz. This may explain why this large
condensor mic actually sounds smooth on the high end. Normally, a
large condensor will sound too bright or tinny on high frequencies for
my taste.
d) KM184/KM185
I had to put all these two together as they are essentially
the same mic, the KM185 has a huge low frequency cutoff for 150hz and lower.
This is a built in feature so it cannot be adjusted. The KM185 was
meant to be used as a voice mic utilizing the low frequency cutoff, whereas
the KM184 meant to be used as an instrument mic. The KM185 should
only be used exclusively as a close miking mic for the bass end of a guitar.
Anything else will sound entirely too thin. The KM184 is more versatile
and does handle low frequency quite well if placed properly. Tonally,
they contain what I like to call a "woody" sound, although not as pronouncd
as the mics below.
e) KM84/85
On the same note as above, these are the older generation
mics that the KM180 series are based upon. The one feature about
these older mics is that they have a completely flat response.
The KM85 has the same low frequency cutoff as the KM185, but without the
boost in high frequency like the K185. These mics also contain a
very "woody" tone more pronounced than the KM180 series. The KM85
can be used on the bass end. The KM84 will have a few problems handling
low frequencies. Proximity effect seems to affect this mic tenfold.
EQ may be needed on an acosutic guitar if using this mic.
OK, here are various sound clips using a combination of
the above mics. Each sample is roughly 1 - 4 MB in size. I
must apologize, but to maintain the original quality of the tone, I couldn't
compress them. No, mp3 doesn't sound anything like the original,
especially for acoustic guitar. Leave the mp3's up to the people
who could care less about tone. These are all natural recordings
with no effects whatsoever. You'll hear stereo and that's based upon
mic positioning. Some samples were recorded witht he setup to sit
in a mix, others were recorded to stand alone as a solo guitar.
See if you can guess which mics were used on each sample:
Sample
1
Sample
2
Sample
3
Sample
4
Note that using two mics requires careful placement so
that when the two signals are combined, they don't unbalance the tone.
Two bass heavy mics will certainly cause more bass end than you want.
Combining a small punchy condensor like the KM185 with a U89 will result
in a good sound if both are properly placed. Before jumping on the
EQ, try various positions to see if you can trash the unwanted frequencies.
4) Phasing
The all important anamoly called phasing. There's
two ways to look at this. One way, just follow the rules and avoid
phasing errors, or the second way, understand what it is and why it's so
important. Most folks just like to follow the rules of recording,
however, they will never create new and interesting sounds because they
do things as they were taught and just like everyone before them.
The eccentric folks like to know the rules and then break them. One
problem though, this isn't a rule you should break, you can bend it but
do NOT break it...
A) THE RULES:
1) Use the 3 to 1 rule for mic placement. If the
microphones are 5 inches from the guitar, then they should be 15 inches
apart from each other.
2) Each mic should be the same distance from the guitar.
I enjoy bending this rule a bit...
3) Matched pairs are better than non-matched. Ok,
so this is another rule I bend. The problem that occurs is
that different mics have different response times to signals. This
can and does cause *some* phasing. Not enuff for me to stop using
an 89 with an 85, but may be enough to bother some folks.
4) Stay away from reflective surfaces. As mentioned
earlier, a good acoustic environment is a must.
B) UNDERSTANDIN':
Phasing occurs simply when the same
sound reaches two different mics at different times. If you understand
what a waveform looks like, then try to picture what would happen if you
had two identical waveforms next to each other. Now shift the lower
waveform to the right. As you shift the wave, if will soon look like
a mirror of the other wave. What happens is the signals cancel each
other out. What this means in guitar world is that you lose some
serious detail in your tone.
Let's look at a single wave:
Now here are two identical waveforms with one shifted
180 degrees, or completely out of phase:
Perfect volume or amplitude is in the center of each waveform
at 0dB. A wave goes above and below that 0dB level. We should
all know that sound is made up of noisy parts (top of the wave), and silent
parts (bottom of the wave). This is called frequency. Low frequency
waves like the 6th string on your guitar have waveforms that are much longer
from peak to peak than high frequencies. Imagine them as rollercoasters.
A low frequency wave would be a gentle flowing ride up and down while a
high frequency wave would be a crazy up and down ride!
So why does the bottom wave get out of phase? As
mentioned, that is based upon timing, or basically when
then sound from your guitar hits the capsule on the mic. If each
microphone doesn't capture the sound at the same time, then you will start
to get a phase shift.
C)RULE #2
I like to bend the rule just a tiny bit on this one.
By placing one mic a tad farther away from the guitar than the second mic,
you are essentially creating what we call a delay, echo, or heck even reverb!
How much reverb you want is up to you. But let me
say this, ALOT of reverb requires each channel to be panned full left and
right, otherwise too much equates into serious phase problems and loss
of frequency if you mix the signals even a tiny bit.
D) COMBATING PHASE ERRORS
Of course correct mic placement will solve most
of your phase problems. There are other ways.
- Pan full left and full right. Do not mix the signals.
No phasing. However, two different mics will give you two different
sounds. Very weird to the ears.
- Use a computer based wave editor. I use Wavelab
and work down to 1ms increments. By first recording each channel
to it's full left and right side, I can then transfer to Wavelab and allowing
me to move either wave by 1ms increments if I want to.
- Follow the rules.
I really could get more in depth about phasing, but there
are numerous websites that expound on it in much greater detail.
Following the rules will greatly enhance your chances of getting a decent,
focused tone from your guitar. If you still don't grasp phasing,
I suggest searching the internet for some more informative sites.
5) Focusing
the guitar for a mix
Up this point I have really only focused
on creating a "big sound" with your guitar. This is the sound I like to
hear, which works especially well with solo guitar. As mentioned,
this involves pan techiques, phase shifting, volume and frequency differences.
One drawback with an open sound is that it isn't a particulary accurate
representation of your guitar. To get a very tight and focused sound
there are a few mic techniques that I will use.
There are two great things that happen with these setups.
1) Phase is negligible. Sound from seperate parts
of the guitar reach each mic the same time, or close to it. This
cancels out most "space" making the guitar sound tight and focused.
It will sound good in mono and accurate in stereo.
2) Frequency response. Each mic will be able to
pick up it's own seperate part of the guitar. There is no crisscrossing
of one area of the guitar which will cause that area to be louder than
the others. If your signals cross at the soundhole, you'll get an
overabundance of bass causing the guitar to sound muddy.
A) "X-Y" mic placement
Two cardioid mics are placed at 90 degrees to each other.
One mic is directly above the other. The issue to get the capsules
as close to each other as possible. Sound reaches both mics at the
same time.
B) A-B mic placement
This was mentioned previously, in other sections,
and one that I use alot. However I didn't elaborate on a few issues
for a focused sound for this technique:
1) Identical
placement from the guitar.
Each mic should be almost the exact distance from the
guitar. If you fail to do this you will lose the tight focused sound
you need.
2) Do not
crisscross the response pattern from each mic. If this is occuring,
then you need to either move the mics close to the guitar, lessening their
pickup diameter, or turn each mic on it's horizontal axis to face away
from each other. If you crisscross signals, you will bring phase
into the picture, not to mention and unbalanced tone.
3) Microphones
Normally this technique will require close miking, or
relatively close. Proximity effect may occur and using two mics with
bass rolloff switches will counter this. U89 and a KM85 are good
choices here. C48 is also good. If you odn't have mics with
bass rolloffs, then you may need to utilize outboard EQ (AGHH!!!)...
Other
nonsense:
There are some other things to consider.
One is utilizing matched pairs of mics and how that differs from unmatched
mics, and how to pan the channels with matched and unmatched mics.
6) Tone
Poems
How many of you when you first heard
this landmark recording had to pick your jaw up from the floor? It
wasn't necessarily Tony's playing, however amazing and precise it might
have been, but it was the tone coming from that microphone, from that mixer,
from that analog tape at 30 ips! Without a doubt, this recording
alone put me on the path of greater enlightenment in the world of acoustic
music and recording it. For the first time, it seemed possible to
get a divine sound from your guitar without all the fancy gadgets and outboard
gear.
I left this for the end of this journal of thoughts and
ideas because you may not rememeber all the details mentioned throughout
this article, but hopefully you'll digest what I've learned, especially
this part, how to get the "Tone Poems" sound, (or equivalent).
Since I started delving into recording, my tastes have
changed a million times and back again. I've owned and reowned the
same mics, the same gear, depending upon my mood, I may sell a treasured
mic, only to reattain a similar one a year later as my taste in sound comes
full circle. Fortunately, investing in a good microphone means that
you only have to invest in it once because they will hold their value,
and many times you sell one for more than you paid. I cannot stress
enough having good quality equipment if you are serious about getting the
best tone from your instrument. No, we won't all have an MCI console,
Neumann U47's, and 2" tape machines that can run at 30 ips, and neither
do I, but get the best you can afford. Once you make that investment,
you won't have to spend another cent, unless you want to...
Now, on to Tone Poems. It will be short and sweet.
First I want to mention some observations about the recording.
1) Reverb was used. "Spatial enhancement", another
name for widening the stereo image. But just a very small amount.
2) The acoustical environment was pristine. I would
imagine you could hear a pin drop when music wasn't being played.
3) Details stood out like mad. Left hand fingering
was detailed but not harsh.
4) Everything went to analog tape.
5) Two microphones were used that had significant bass
rolloffs.
6) Tony's guitar is very tight and focused, other than
the reverb.
7) Close miking was used.
8) No additional effects were utilized. Mic - mixer
- reverb - tape.
9) D'darrio strings were used (ha!)
10) Tony played with impeccable dynamics, volume control.
Hopefully, you'll be able to clue in to the cause of some
of these observations, and begin to make an educated guess and a picture
in your mind of what the setup might have looked like.